Provides UI widget and layout functions for writing Shiny apps that work well on small screens. Designed to work especially well for creating Shiny Gadgets.
Inspired by the lovely Ratchet CSS framework, though currently miniUI doesn’t use any of Ratchet’s CSS code.
devtools::install_github("rstudio/miniUI")Check out the Designing Gadget UI article on shiny.posit.co.
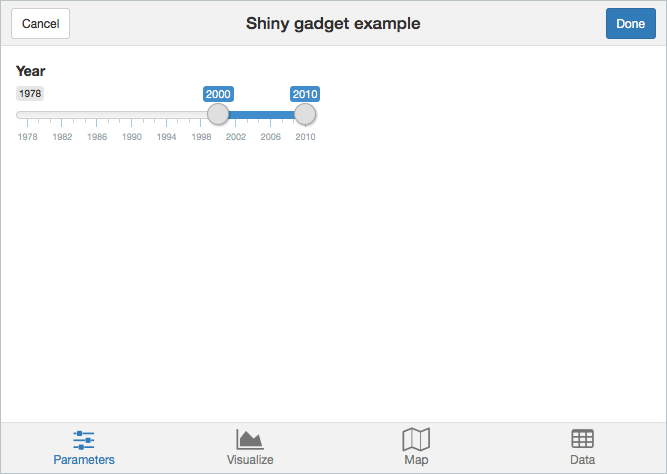
ui <- miniPage(
  gadgetTitleBar("Shiny gadget example"),
  miniTabstripPanel(
    miniTabPanel("Parameters", icon = icon("sliders"),
      miniContentPanel(
        sliderInput("year", "Year", 1978, 2010, c(2000, 2010), sep = "")
      )
    ),
    miniTabPanel("Visualize", icon = icon("area-chart"),
      miniContentPanel(
        plotOutput("cars", height = "100%")
      )
    ),
    miniTabPanel("Map", icon = icon("map-o"),
      miniContentPanel(padding = 0,
        leafletOutput("map", height = "100%")
      ),
      miniButtonBlock(
        actionButton("resetMap", "Reset")
      )
    ),
    miniTabPanel("Data", icon = icon("table"),
      miniContentPanel(
        DT::dataTableOutput("table")
      )
    )
  )
)
Full source at: https://github.com/rstudio/miniUI/blob/master/examples/tabs.R
The miniUI package is licensed under the GPLv3.
You generally don’t need to do this. This build step is only needed if you want to contribute to the development of the package by modifying the built-in CSS styles.
Prerequisite: You must have Node.js installed.
# Install the grunt command if necessary
which grunt || sudo npm install -g grunt-cli

# Install dependencies
cd tools
npm installcd tools
grunt